
Configure each capability independently. Use your own Microsoft tenant and an Evidize organization administrator account. Features appear only when their production configuration is available. Keep a working recovery sign-in method until your IT team completes acceptance.
Download the matching PDF guide1. Prepare identities and deployment scope
Use Settings > Team & access > Microsoft 365 in https://portal.evidize.com. Record your Directory (tenant) ID, the immutable Microsoft user object IDs of your recruiters, and the object IDs of organizers whose meetings may be imported. Email addresses are display and contact details; they do not establish identity ownership.
Create a dedicated recruiter deployment group. Manage Evidize sign-in assignment, provisioning scope, Outlook installation, and transcript organizer policy separately. Removing one assignment does not automatically remove every other capability.
Your administrators grant Microsoft consent and configure deployment using their existing administrative roles. Evidize itself does not need a customer Azure subscription role, a directory administrator role, or permission to administer your tenant. Outlook requires a compatible Microsoft 365 client and Exchange Online mailbox; Teams transcription must be permitted by your licensing and meeting policies.
-
Select the intended Evidize organization and confirm you are its administrator.
-
Record the production client IDs displayed in Evidize. Keep development and staging registrations, credentials, redirects, and deployment manifests separate.
-
Decide which recruiters need sign-in, provisioning, portal drafts, Outlook installation, and transcript import. Start with a defined deployment group.
-
Retain an authorized recovery administrator and document your organization's retention and AI preferences.
2. Review the permissions
Evidize Portal (Production) is the identity application. It uses openid, profile, and email for sign-in. The production SSO client ID is a7172fc0-085c-4295-8721-188cb05def35. Identity access does not grant mailbox or transcript access.
Evidize for Outlook uses Office.js ReadWriteItem to work with the currently open Outlook item. Installing the add-in does not authorize background mailbox access.
The separate delegated mailbox connection requests Mail.ReadWrite only when email drafts are enabled, and Calendars.ReadWrite only when calendar holds or Teams hosting are enabled, with offline_access for renewal of that connection. Microsoft grants broader mailbox access than a drafts-only permission; Evidize restricts its operations to tracked draft messages and attendee-free events created by Evidize. Users review and send invitations themselves in Outlook.
The separate transcript service uses application OnlineMeetingTranscript.Read.All and OnlineMeetings.Read.All. Restrict it in Microsoft Teams to explicitly approved organizers, and enter the same organizer IDs in Evidize. Evidize only requests meetings explicitly linked to an interview occurrence. Microsoft organizer policy covers an organizer's meetings, so the additional interview linkage is enforced by Evidize.
SCIM uses an Evidize-issued, organization-scoped bearer credential. Microsoft Entra pushes user changes to Evidize; Evidize does not read your directory to provision users. Administrator roles remain explicitly managed in Evidize.
The integration does not request Mail.Send, application mailbox permissions, recordings, SharePoint access, directory write permissions, or Azure subscription access. Review each consent screen against the displayed capability before granting it.
Optional Teams hosting uses delegated Calendars.ReadWrite and OnlineMeetings.ReadWrite for the connected organizer. It does not require Mail.Send, application calendar write access, directory roles, or customer Azure subscription access. These delegated permissions are broader than one item at Microsoft; Evidize restricts its operations to tracked organizer-owned events.
3. Connect Microsoft sign-in
Connect the organization's tenant and bind each existing member to their immutable Microsoft user object ID. Evidize validates tenant and identity bindings; matching email text does not link an account. Follow the guided consent, verification, and activation controls shown in the portal.
Publisher verification is a separate Microsoft verification process. Check the actual publisher status shown on the Microsoft consent screen. Do not assume a logo or an evidize.com publisher domain means that Microsoft has verified the publisher.
-
In Microsoft 365 settings, enter your Directory (tenant) ID and save the tenant connection.
-
Use the guided Microsoft consent action and confirm that the correct tenant and Evidize identity application are displayed.
-
Choose the existing Evidize member, then choose a known Microsoft account. The list contains accounts provisioned through SCIM, accounts evidenced by verified Microsoft sign-in, and the administrator verified during tenant setup. It does not search your Microsoft directory or request directory permissions. Names and emails are Evidize profile labels, not proof of ownership. Already-linked accounts cannot be reassigned. If an account is missing, use Advanced: enter a Microsoft Object ID after confirming the ID in the connected tenant, or complete SCIM provisioning. Resolve conflicts explicitly instead of relinking by email.
-
During your human acceptance, use the built-in sign-in verification control with a linked user, review the result, and activate SSO when the portal permits it.
-
Keep your recovery sign-in method available. If SSO is the only permitted method, restore an authorized recovery path before disconnecting it.
4. Configure Entra provisioning
Create a separate non-gallery enterprise application named Evidize Provisioning. Configure automatic provisioning using the SCIM tenant URL copied from Evidize. The URL is organization specific: https://api.evidize.com/scim/v2/{organization_id}. Never substitute another organization's ID.
Provision userName, externalId, active, name.givenName, name.familyName, and the primary work email. Map Microsoft's objectId to externalId. Scope provisioning to assigned users and groups. Group assignment controls which users are provisioned; SCIM group objects and group-to-administrator role mapping are not used.
Disabling or deleting a provisioned user revokes that user's Evidize access and mailbox connection. Removing provisioning credentials stops future synchronization but does not delete existing users. Explicitly offboard users before stopping provisioning when immediate revocation is required.
-
Create or rotate a provisioning token in Evidize. Copy it immediately; Evidize only shows the secret once.
-
In Entra > Enterprise applications > Evidize Provisioning > Provisioning, select Automatic, paste the tenant URL and secret token, and configure the attribute mappings above. Under Mappings, keep Provision Microsoft Entra ID Users enabled and disable Provision Microsoft Entra ID Groups; group assignment scopes users without provisioning group objects.
-
Select Sync only assigned users and groups. Assign the intended recruiter group and review its direct members; do not rely on nested group expansion.
-
During human acceptance, use Entra's connection and on-demand provisioning controls, inspect its provisioning logs, and confirm ordinary user access in Evidize before starting broad provisioning.
-
For rotation, create a new credential, replace the secret in Entra, and complete human verification during the one-hour overlap. Revoke old credentials after confirmation. Check the expiry displayed by Evidize and rotate before it expires. Before removing the administrator who issued a token, rotate it from a retained administrator account; issuer removal revokes that administrator's provisioning credentials.
-
For reconciliation or delayed updates, review Entra provisioning logs, resolve the reported safe error, then use Entra's retry/restart provisioning controls. Do not create duplicate accounts to bypass an immutable identity conflict.
5. Deploy Evidize for Outlook
Evidize for Outlook is an Office Add-in. Deploy its production XML manifest through Microsoft 365 Integrated apps to the approved recruiter users or group. This installation is separate from Evidize SSO, SCIM, and delegated Outlook access. Keep the add-in ID stable when updating an existing deployment.
The screenshots below show the current Microsoft 365 admin and Outlook interfaces. Account details have been removed. Your tenant may display slightly different labels. A deployment confirmation in Evidize is your administrator attestation, not proof that the add-in has appeared for every user.
-
Confirm the intended recruiters have supported Microsoft 365 licenses and active Exchange Online mailboxes. Use an administrator permitted to deploy Outlook add-ins; Microsoft lists Exchange Administrator for this control, subject to your tenant policy. Prepare a top-level, mail-enabled recruiter group or a small set of named users. Nested and non-mail-enabled security groups are unsupported.
-
In Evidize, open Settings > Team & access > Microsoft 365 > Outlook setup. Download the production Outlook installation file (.xml), or use https://portal.evidize.com/outlook-manifest.xml as the manifest URL. Use this Office Add-in manifest, not an Entra app registration ID or a Teams app package.
-
In the Microsoft 365 admin center, open Settings > Integrated apps > Deployed apps, then choose Upload custom apps.
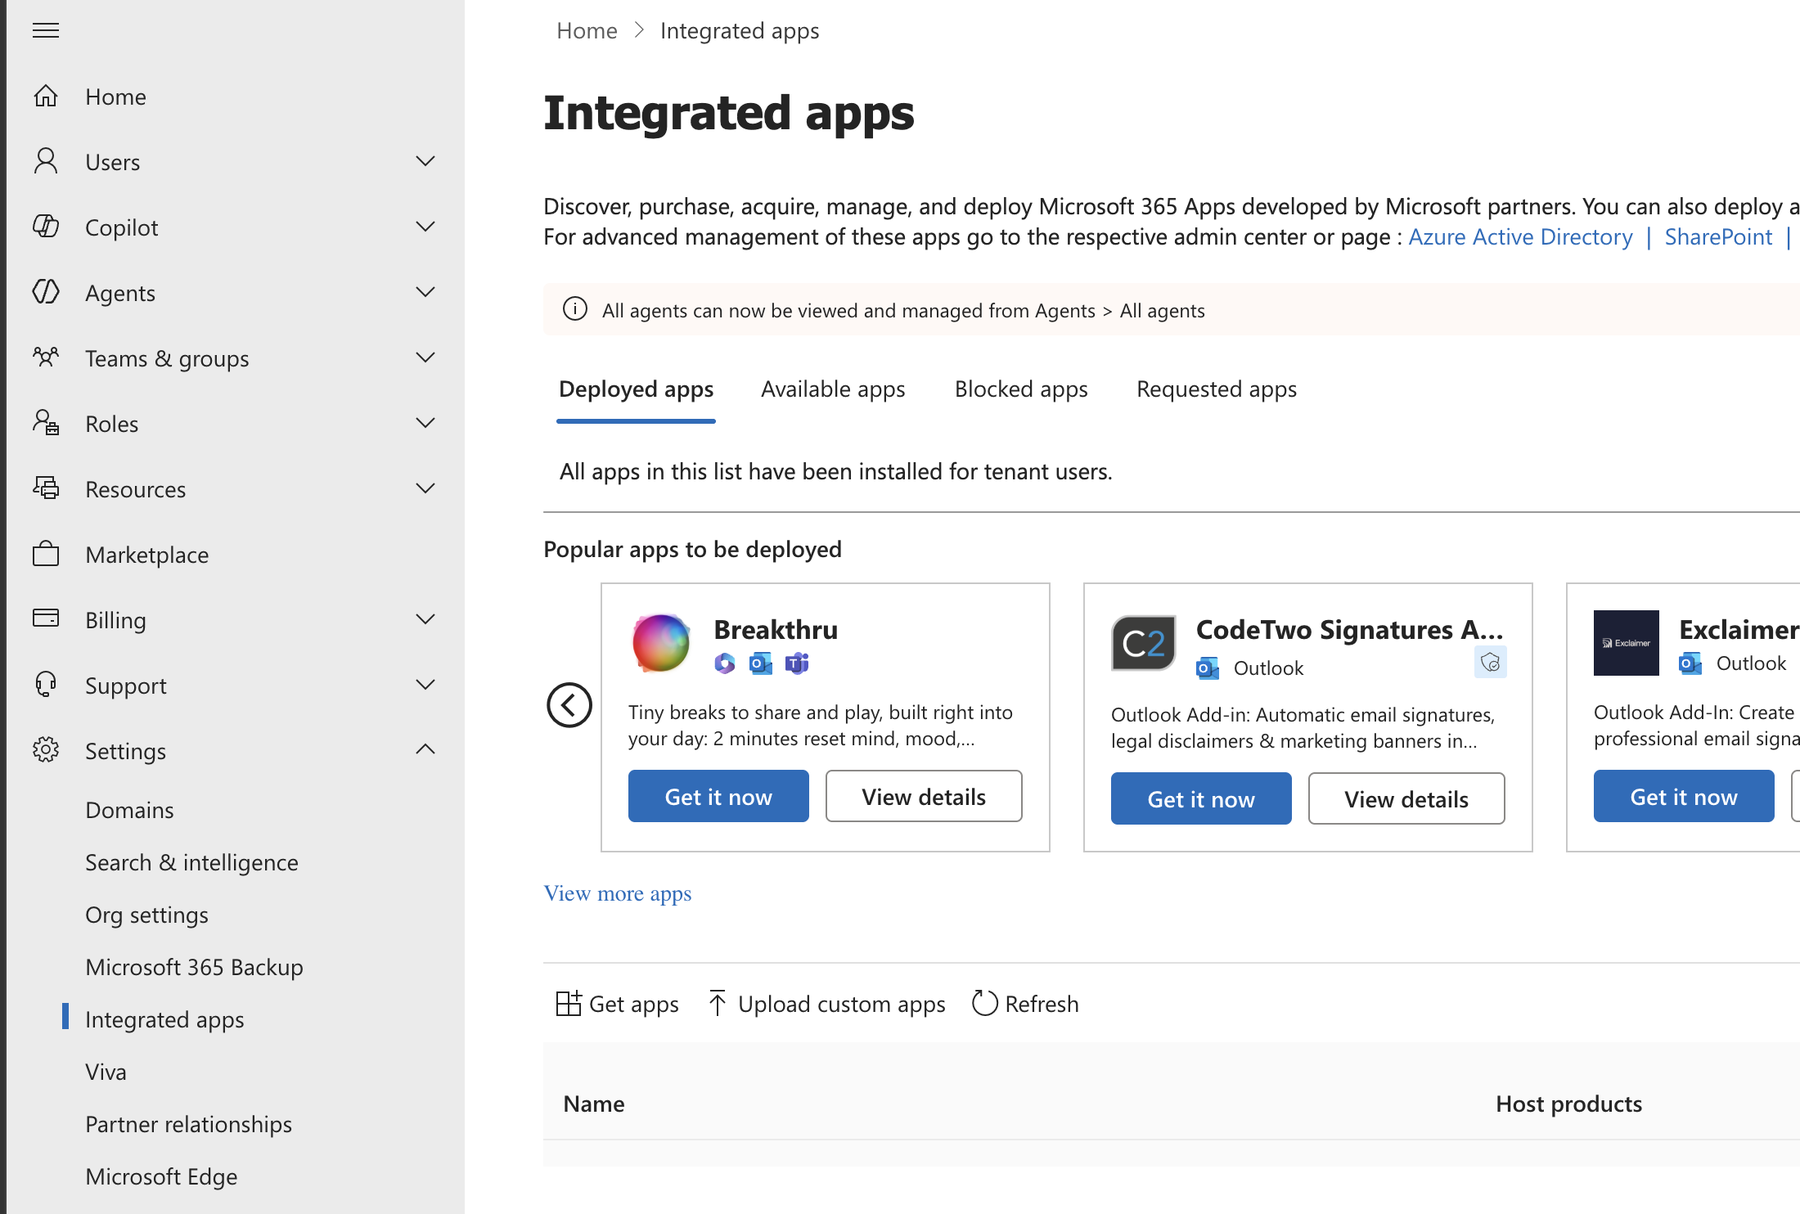
Open Settings > Integrated apps and choose Upload custom apps. -
In Deploy New App, set App type to Office Add-in. The wizard may default to Teams app; change it before continuing.
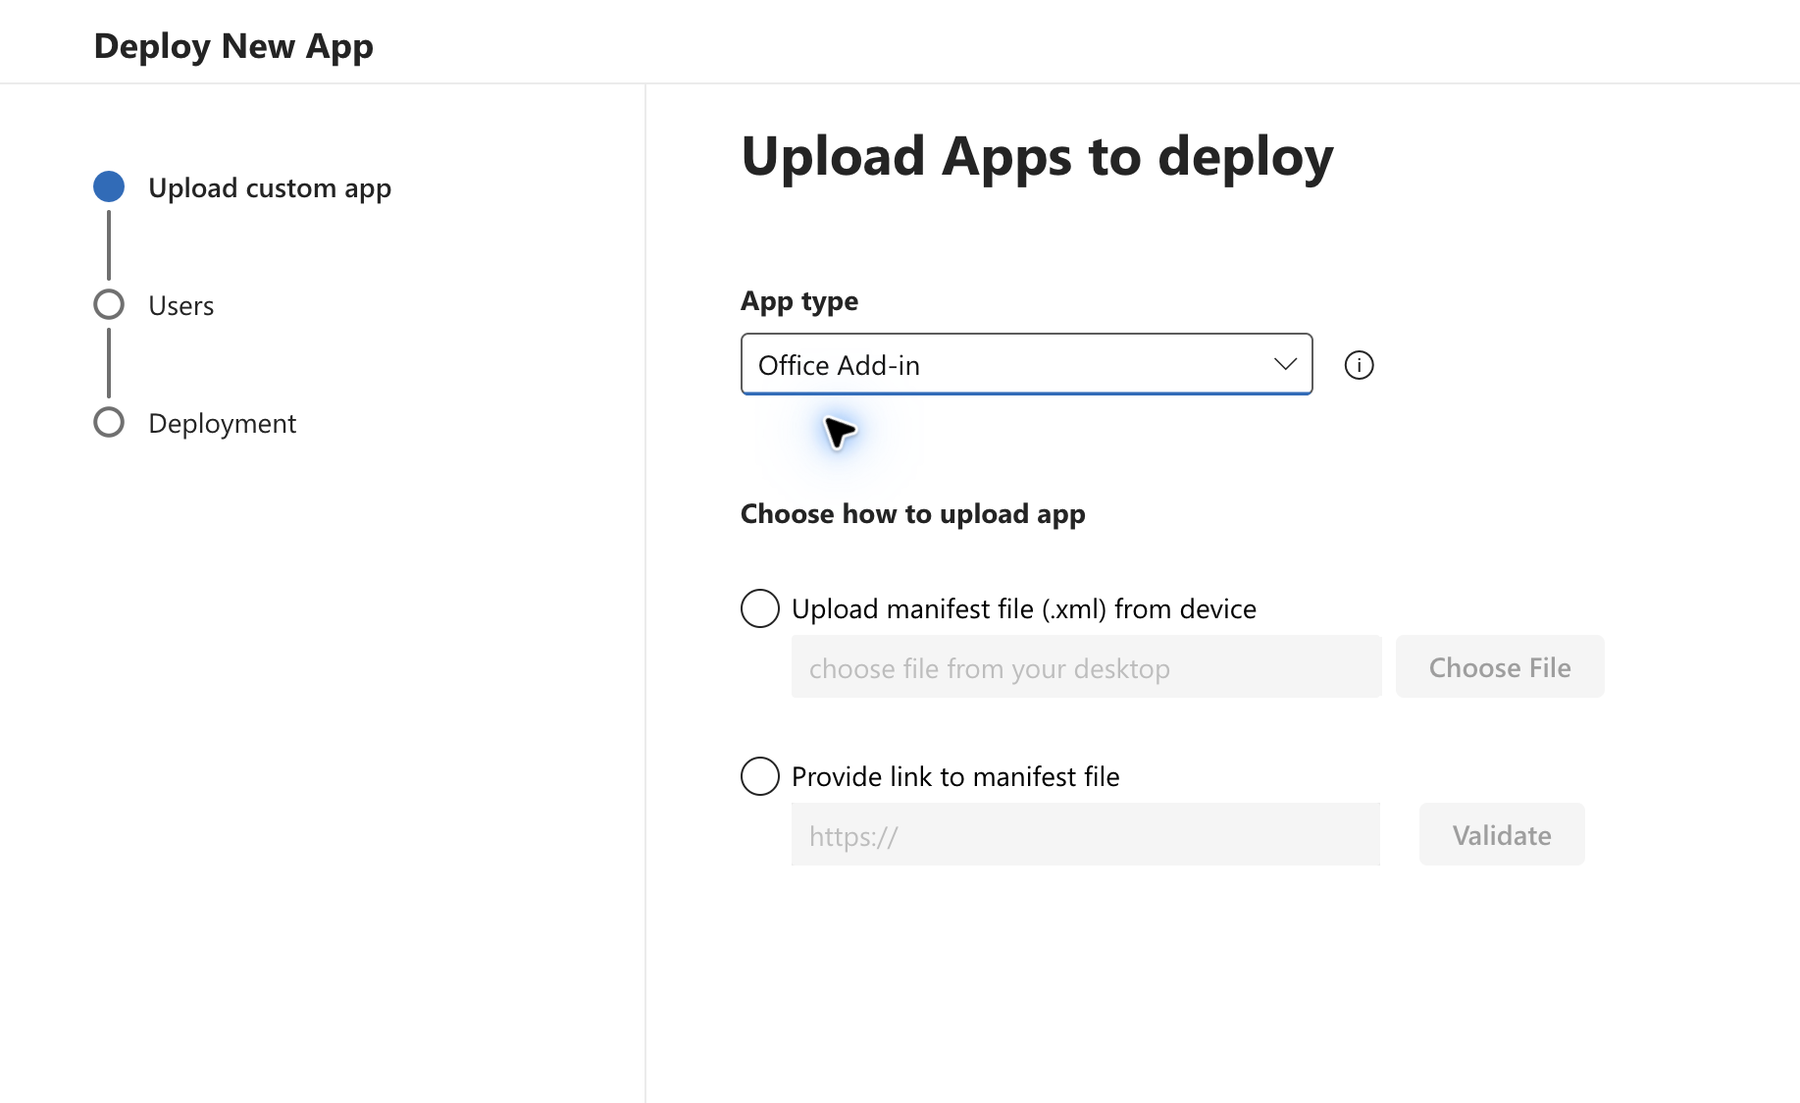
Select Office Add-in rather than the default Teams app. -
Choose Provide link to manifest file, paste https://portal.evidize.com/outlook-manifest.xml, and select Validate. Wait for Manifest file validated, then choose Next. If your policy requires a local file, choose Upload manifest file (.xml) from device and select the production XML downloaded from Evidize.
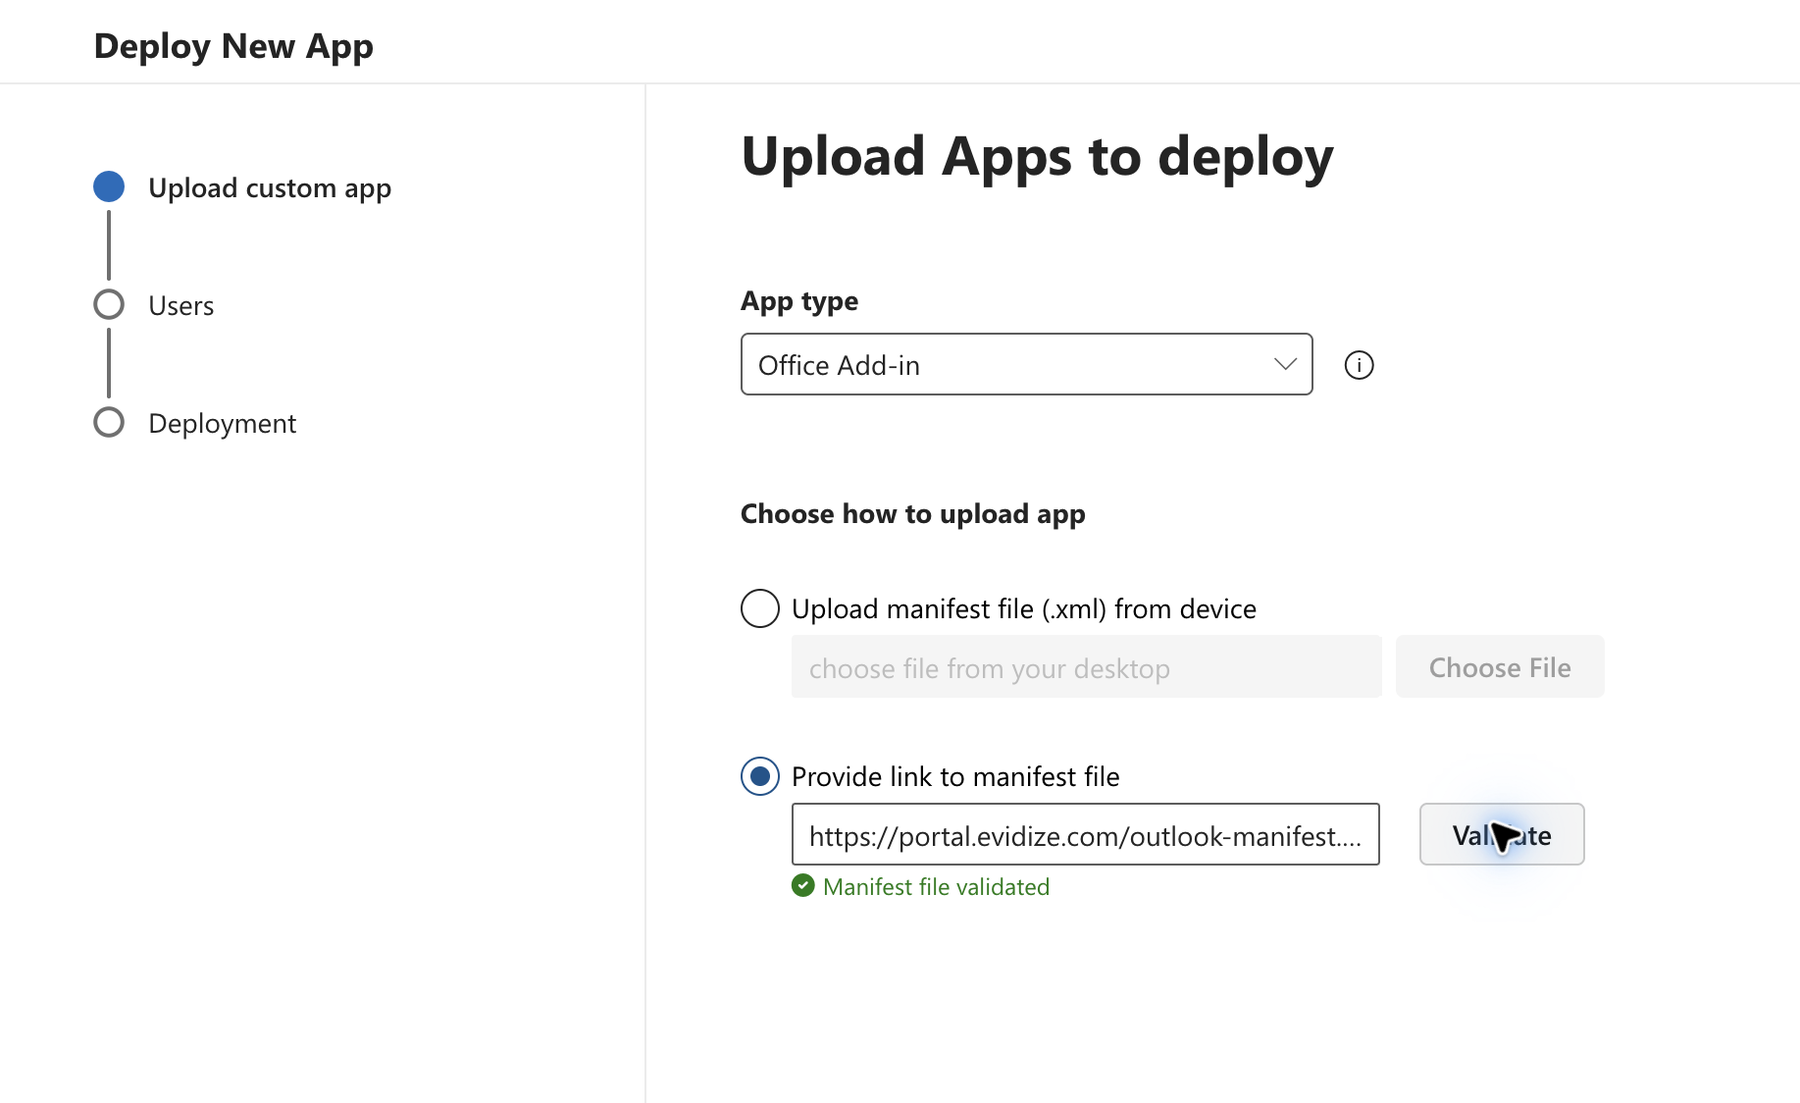
Provide the production XML manifest URL and wait for validation. -
On Add users, choose Specific users or groups and select only the approved recruiter group or named users. Check the selected scope before choosing Next; All users would expose the add-in tenant-wide.
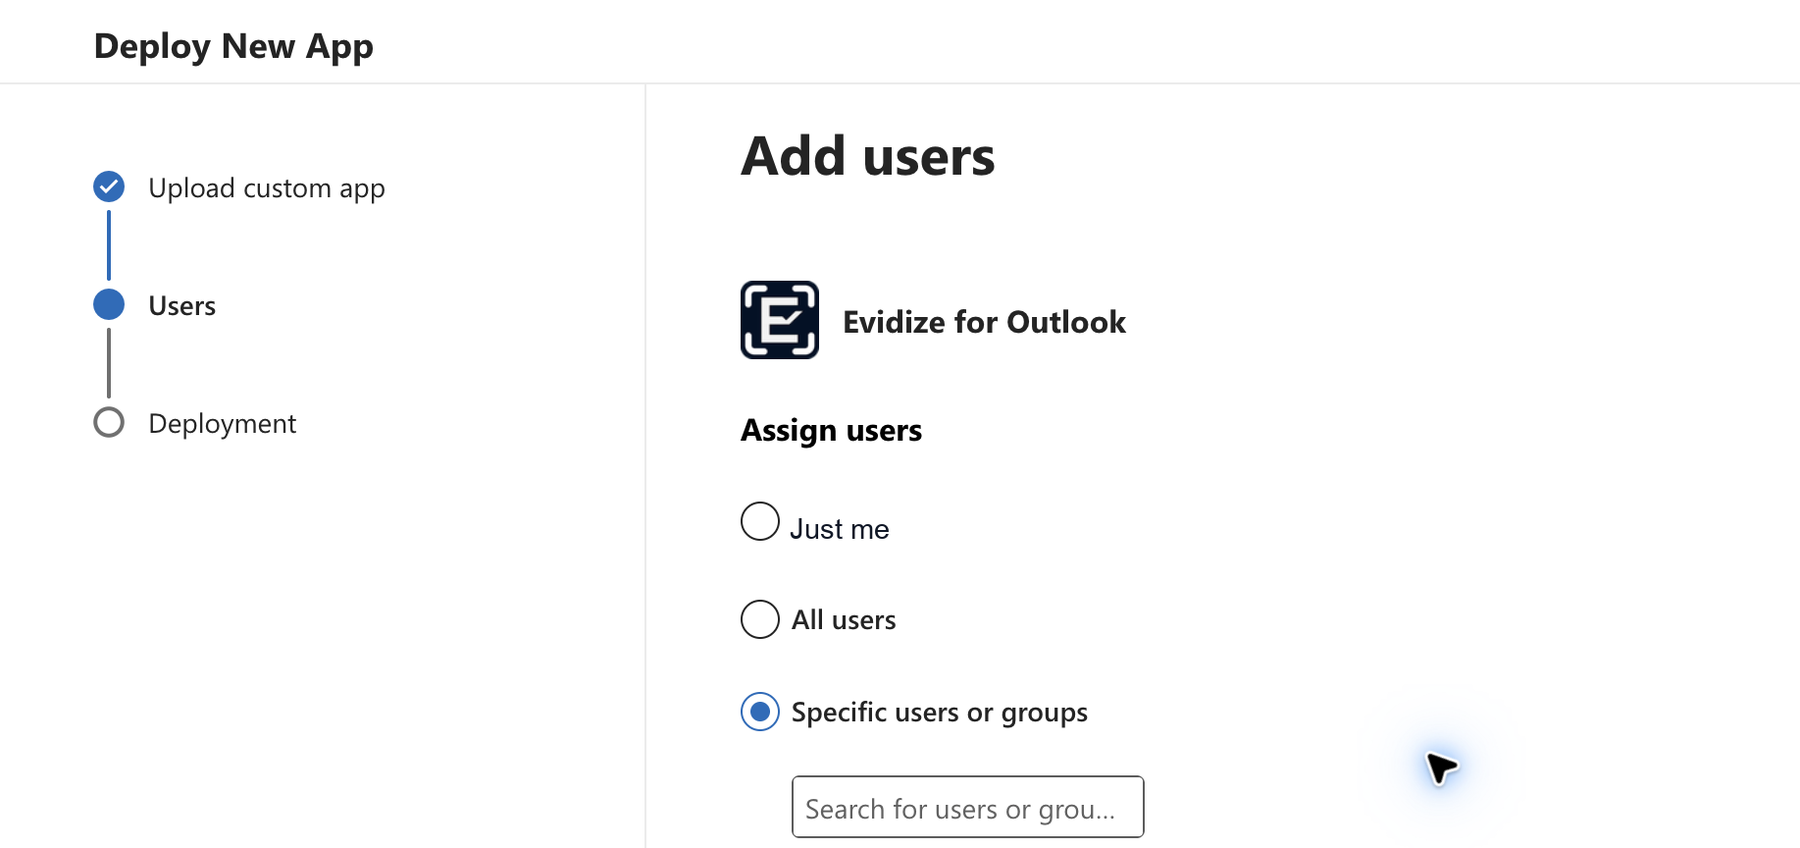
Choose Specific users or groups, then search for your approved recipients; this example has no recipient selected. -
On Accept permissions requests, check that the app is Evidize for Outlook for Outlook and that ReadWriteItem is listed. Microsoft also displays SendReceiveData and ProfileAccess as add-in capabilities. These are separate from the delegated Microsoft Graph permissions configured in Evidize. Review every capability under your organization policy, then choose Next.
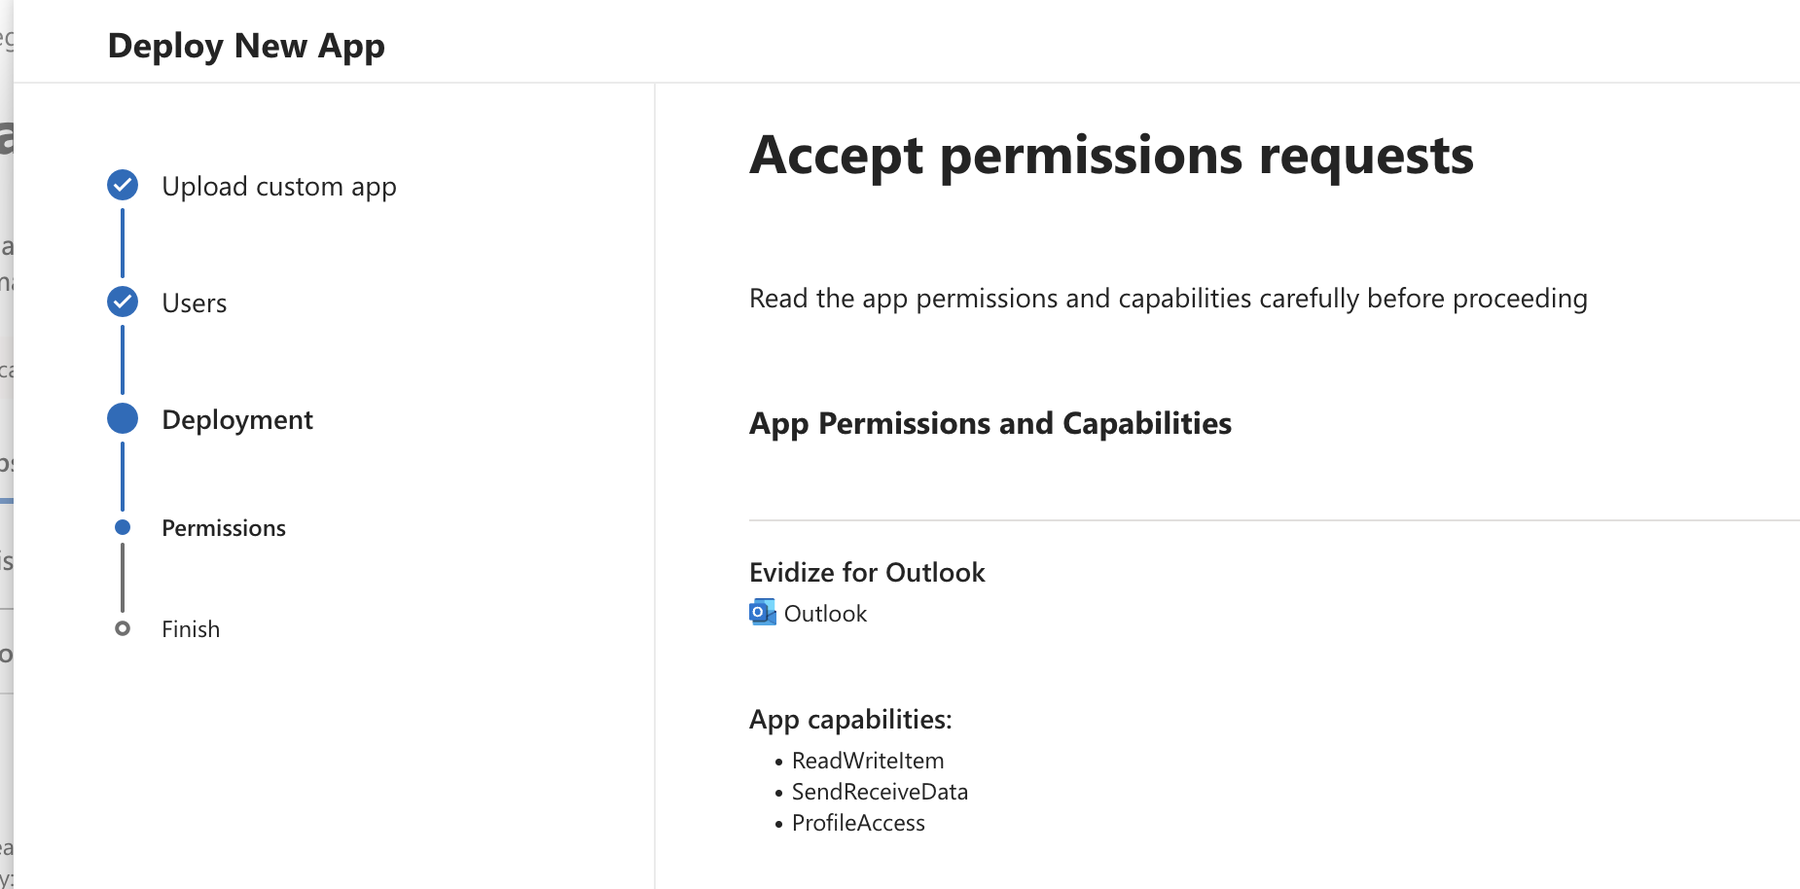
Review the Outlook add-in capabilities before proceeding. -
On Review and finish deployment, confirm Evidize for Outlook and the intended assigned users or group, then choose Finish deployment. Wait for Microsoft to change Deployment in progress to Deployment completed before choosing Done. Then check Deployed apps for Evidize and record the assigned scope. Do not submit the same manifest again while processing is pending. The screenshot shows an example single-user review; use your approved recruiter scope for your rollout.
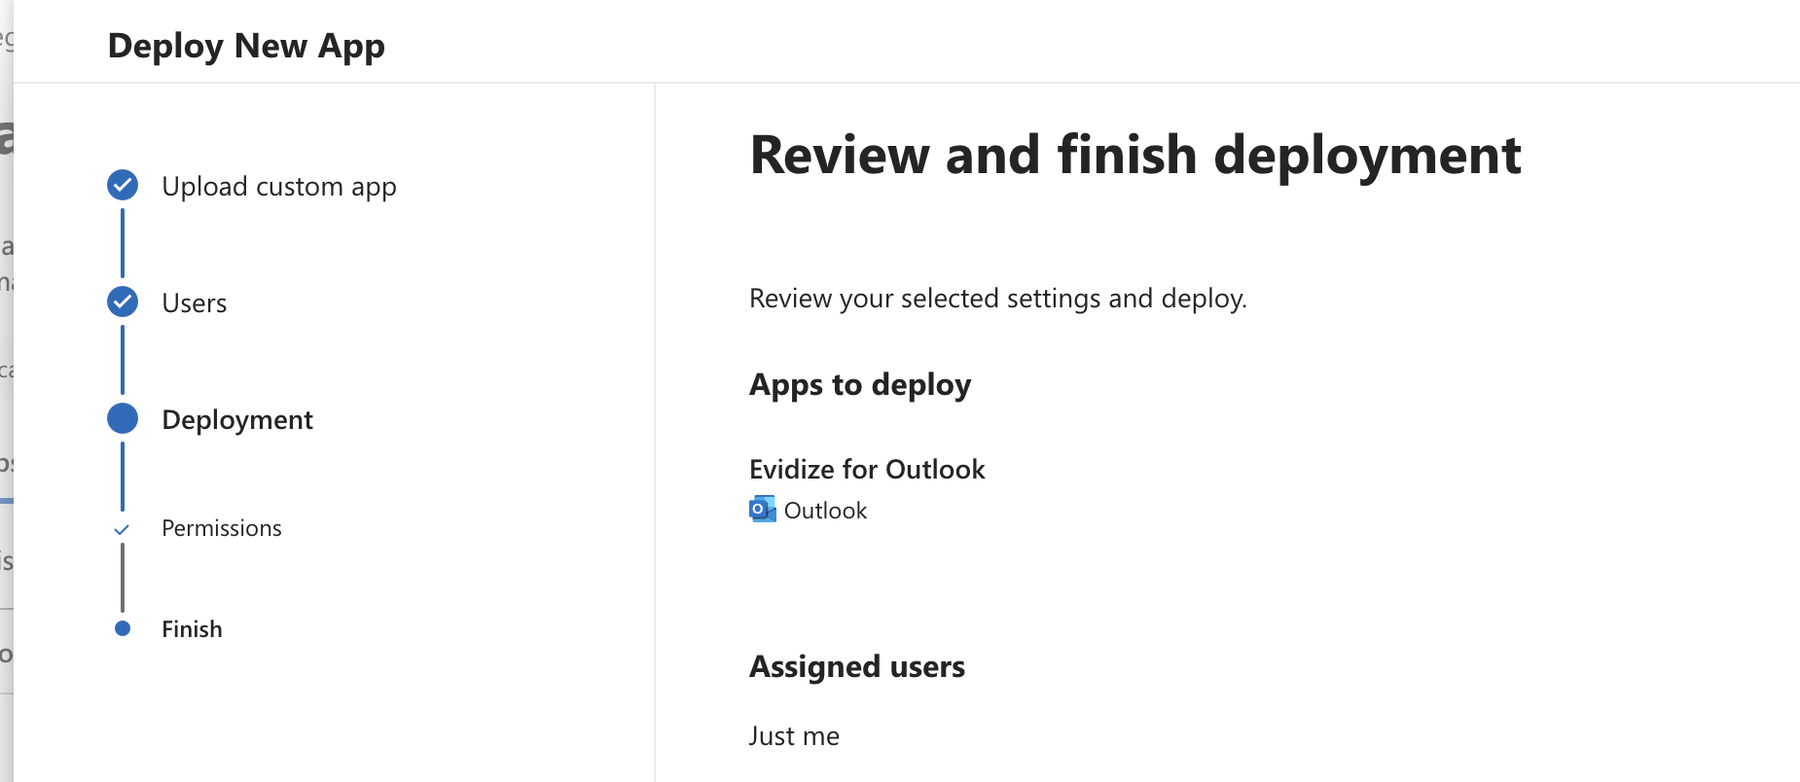
Illustrative single-user review only. Confirm your approved recruiter assignment before finishing deployment. -
Allow up to 24 hours for Microsoft deployment to reach assigned users. In Outlook on the web, start a new calendar event and open Apps. In classic Outlook for Windows, open Calendar > New Meeting and look for the Evidize ribbon group with Schedule interview. The screenshot shows the web menu before this sample tenant deployed the add-in; it is not evidence of a completed rollout. If the command is missing, check assignment, mailbox eligibility, and propagation, then restart Outlook before marking setup complete.
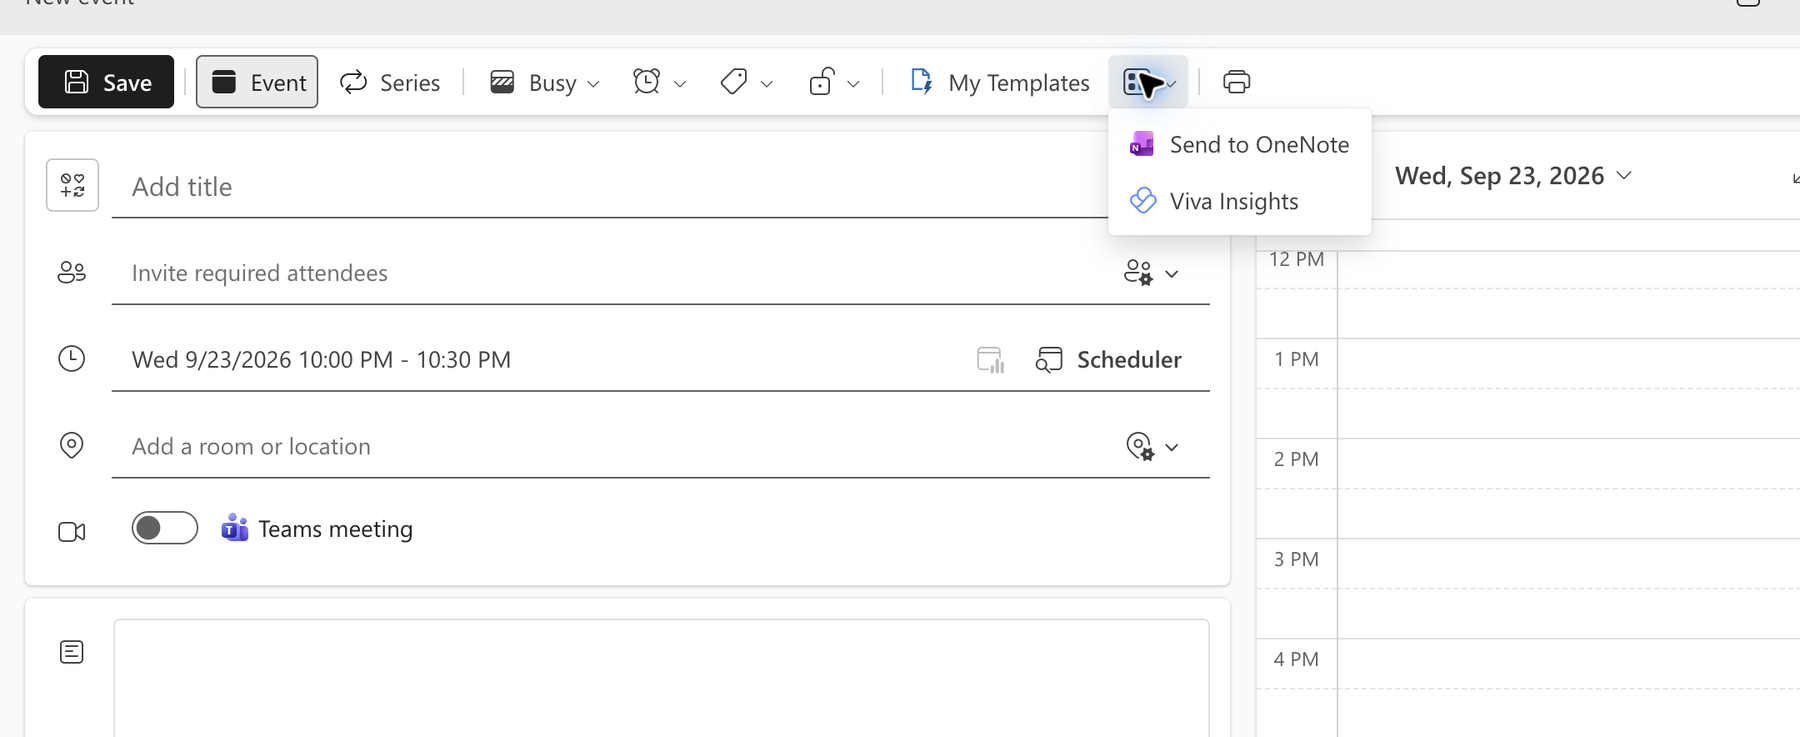
Outlook on the web menu location only: Evidize was not deployed in this sample. Assigned users should find it here after rollout. -
After an assigned recruiter confirms the command appears, mark Outlook deployment complete in Evidize. To withdraw access later, edit the assigned scope or remove the deployment in Integrated apps. Removing the add-in does not revoke separate SSO or delegated Outlook grants.
6. Create interviews and prepare Outlook invitations
Enable delegated Outlook access in organization Microsoft 365 settings and select email drafts, calendar holds, or both. Each recruiter connects their own Microsoft account from Account settings > Outlook connection. A tenant administrator may need to grant consent according to your Microsoft consent policy. Save your capability choices before starting the consent action.
Start from Interviews > Create interview, or the homepage Create interview form. Enter the candidate, role, primary hiring manager, date and duration. Choose New Teams meeting when available, or paste an existing meeting link. Choose Create interview. For a new Teams meeting, Evidize prepares the internal meeting as part of creation. Then choose Prepare invitation in Outlook when calendar access is available; this prepares an attendee-free calendar item containing the protected candidate link.
Choose Open invitation in Outlook. Add the candidate and hiring manager from the displayed recipient list, plus any additional interviewers, review, and send in Outlook. Keep the native Teams meeting option off on this candidate invitation so it does not expose an unprotected joining link. Evidize does not send the invitation. Once the candidate invitation is linked to its Evidize-created internal meeting, manage rescheduling and cancellation through that candidate invitation; the background worker synchronizes supported changes.
The connection must belong to the user's bound identity in the organization's configured tenant. The portal tracks the owner, request ID, Microsoft item ID, and version. Only the owner can edit their tracked item. Repeating the same creation request does not intentionally create another item.
A calendar hold has no attendees. It is not a sent invitation. A draft email is not sent by Evidize. If an item is changed in Outlook, refresh it before editing again. Sent messages and meetings with attendees are no longer editable through this draft workflow.
Changing enabled draft or hold capabilities revokes stored Evidize connection tokens and requires recruiters to reconnect with the new permission selection. Existing Outlook items remain. Microsoft may retain an earlier broader tenant consent grant; your IT administrator can revoke that grant separately when removing a permission.
If calendar access is unavailable, the form explains setup and retains Create interview and the copy-invitation fallback. An uncertain interview-creation response blocks repeating the same form: inspect your interviews first. Reopen the original tracked invitation rather than creating a second item. Pasted meeting links and invitations that have not been linked to an Evidize-created internal meeting are not automatically synchronized.
-
Enable the Microsoft connection, select email drafts and/or calendar holds, and save the organization's settings. Grant only the selected delegated scopes when administrator consent is needed.
-
Open Account settings > Outlook connection and connect or reconnect your Microsoft account. Return to the interview creation form and choose Refresh Outlook setup; entered details are retained.
-
Choose Create interview, then Prepare invitation in Outlook, then Open invitation in Outlook. If preparation fails, retry for the same interview. After closing the success screen, use the interview Actions menu to prepare or open its invitation. Do not create a duplicate interview.
-
If the portal reports a version conflict, refresh the item and reconcile your changes instead of overwriting another edit.
-
Disconnect a recruiter's mailbox in the portal to stop Evidize access. For incident response, also revoke the applicable Microsoft delegated grant or user sessions using your normal IT process.
6a. Create and synchronize Teams interview meetings
Teams hosting is an independent organization opt-in. In Microsoft 365 settings, open Outlook setup, enable account connections and Allow users to create Teams meetings, save, then grant the selected delegated permissions. Recruiters reconnect after the permission selection changes. Existing identity-only SSO permissions are unchanged.
In the portal or Outlook add-in, select New Teams meeting, enter the candidate details, future time and duration, and choose Create interview. Evidize prepares a separate attendee-free calendar event in the connected organizer's mailbox titled Interview meeting - [candidate name]. Its body warns that the direct Teams link is unprotected, for hiring managers and interviewers only, and must not be shared or forwarded to candidates. The connected recruiter is the Teams organizer even when another hiring manager is assigned in Evidize.
In the Outlook add-in, Evidize updates and saves the invitation already open in Outlook, then links it for synchronization when the client supports that operation. In the portal, use Prepare invitation in Outlook and Open invitation in Outlook. Candidates receive the protected Evidize link in that invitation. Review and send it yourself; never add a second native Teams link to the candidate invitation.
Evidize requests allowTranscription=true and confirms the returned meeting options. This permits transcription but does not start it. Teams policy, licensing, and organizer permissions remain authoritative. No transcript is guaranteed. Start transcription in Teams or have IT configure supported organizational automation.
Automatic recording is off by default. An administrator may allow it, and the organizer must select Automatically record this meeting for each new host. This is meeting recording, not a transcript-only switch. Evidize does not retrieve recordings. Confirm your Microsoft participant-notification and agreement settings through your own rollout process.
After interview creation, Evidize associates the event and online meeting with the interview and queues transcript import only when its separate setup permits the organizer. AI availability and credits do not control import; this change configures no AI model.
If host creation is interrupted, choose Finish meeting setup for the saved meeting. An uncertain creation is reconciled by its tracked identifier instead of blindly creating again. Do not create another host until the previous outcome is reviewed in Outlook. An abandoned host remains in the organizer’s calendar for manual cleanup. Session deletion or disconnection removes local access and does not cancel a Microsoft calendar event.
Once linking succeeds and synchronization is enabled, the candidate invitation controls the schedule. Edit its date/time or cancel it in Outlook. The scheduled Azure worker checks linked invitations every two minutes and updates the internal meeting, Evidize schedule and transcript collection window. The candidate's protected link stays the same. Cancellation or deletion detected by the worker revokes protected access before it attempts internal-meeting cleanup. Do not manage the schedule by editing the internal meeting.
Synchronization is not immediate: throttling, expired permissions or queued work can delay it. Use the interview's synchronization status and recovery controls when attention is required. Retry reconciles the existing items rather than creating new invitations. The worker does not send attendee updates; the organizer controls sending Outlook updates and cancellations.
Automatic calendar synchronization supports linked, single-instance invitations and their Evidize-created internal meetings. It does not synchronize arbitrary pasted links or recurring invitation series. Changed ownership, revoked access or attendees added to the internal meeting stop automatic writes and require review. An interview with Microsoft bindings cannot be transferred across Evidize organizations.
-
Enable Teams hosting, obtain delegated consent, and connect the organizer account.
-
Confirm the organizer has an Exchange Online mailbox and Teams licensing and policy that permit meeting creation and transcription.
-
If importing transcripts, also approve that organizer in Evidize and apply the transcript application access policy in Teams.
-
Select New Teams meeting and choose Create interview. Finish any interrupted setup using the saved meeting. Prepare or update the candidate invitation, confirm it is linked, then review and send it in Outlook.
-
If host association fails after interview creation, choose Connect Teams meeting. Do not recreate the interview. If the form was closed, open Use a previously created meeting, select Connect to an existing interview, and search by candidate or date; the transcript panel also supports explicit association correction.
-
Complete human acceptance before broad rollout: no functional Microsoft or transcript tests were run during this implementation.
7. Permit transcript import for named organizers
Consent to the separate Evidize Transcript Service application using the production client ID displayed in settings. Grant only OnlineMeetingTranscript.Read.All and OnlineMeetings.Read.All. Configure a Teams application access policy for named organizer object IDs; do not grant a global organizer policy.
If an organizer already has an application access policy, preserve its other approved applications. Have your Teams administrator review the combined policy before assignment. Policy propagation can take up to 30 minutes. The following example is for a new dedicated policy; replace all placeholders with values from your own tenant and Evidize settings.
Enter the same approved organizer object IDs in Evidize and enable transcript import. Link each Teams interview occurrence with its organizer, join URL, start, and end. Evidize's scheduled worker checks linked meetings every two minutes, persists work in SQL, and applies throttling and bounded retries for 24 hours. A two-minute schedule is not a guarantee that Microsoft has published a transcript.
Teams must actually produce a transcript. The importer does not transcribe recordings or create missing speech. Optional Teams hosting can request automatic recording only when both the administrator and organizer opt in; allowing transcription alone does not start it. Missing transcription, denied access, expired sources, or removed connections produce an actionable import state. Recurring meetings must be linked with the correct occurrence times.
-
Review the separate transcript application's client ID and grant the two application permissions in the intended Microsoft tenant.
-
Use MicrosoftTeams PowerShell to configure the organizer application policy and assign it only to approved organizers.
-
Save the organizer allowlist in Evidize and enable import. Configure organization AI preferences separately; ingestion does not require AI credits.
-
During human acceptance, conduct an approved Teams interview with transcription enabled, link that occurrence in Evidize, and review the imported text and source details.
-
To revoke access, disable transcript import in Evidize, remove the service from the applicable organizer policies, and revoke its Microsoft application grant if no longer required. Stored evidence remains subject to your retention and preservation rules.
            Connect-MicrosoftTeams -TenantId '<customer-tenant-id>'
New-CsApplicationAccessPolicy -Identity 'Evidize-Transcripts' `
  -AppIds '<production-transcript-client-id>' `
  -Description 'Approved Evidize interview organizers'
Grant-CsApplicationAccessPolicy -PolicyName 'Evidize-Transcripts' `
  -Identity '<approved-organizer-object-id>'
8. Operate, recover, and complete acceptance
Imported transcripts are private interview evidence. Viewing and download follow session-specific access. Preserve source versions and citations when reviewing analysis. Missing speaker names or timestamps are shown as unavailable; they are not guessed.
Analysis is currently unavailable; transcript import and review remain independent. Import, viewing, technical retries, and automatic late-segment refreshes are uncharged. When analysis becomes available and organization AI settings permit it, the initial completed interview analysis costs 10 credits. A deliberate reanalysis of changed assessment context requires a separate quote. AI output does not change human scorecards, rankings, integrity verdicts, or hiring decisions.
Retention, preservation holds, exports, and deletion apply to transcripts and their analysis. Deleting transcript evidence suppresses automatic reimport. Cross-organization transfer of interviews containing Microsoft bindings or transcripts is initially blocked.
When reporting a problem, provide the organization and interview reference, approximate time, affected capability, and safe error code. Never include bearer tokens, authorization codes, private keys, transcript text, or candidate details in ordinary support messages.
-
Complete human acceptance for SSO and recovery, provisioning/deprovisioning, credential rotation, Outlook deployment, draft ownership and concurrent edits, organizer restrictions, transcript import and citations, and retention/export/deletion.
-
After analysis is separately enabled, confirm AI billing and output using approved interview data and an authorized credit budget. This is not required to import or read transcripts.
-
Check denied access with unauthorized users and organizers. A same-tenant deployment cannot establish cross-tenant isolation; schedule a separate customer-tenant validation before relying on that assurance.
-
For authorization failures, check the capability's consent, bound tenant, organizer allowlist and policy, revoked credentials, and the displayed provisioning or import error before retrying.
-
Disable the affected capability while investigating. Revoking an integration does not erase records already retained under your policy or preservation hold.